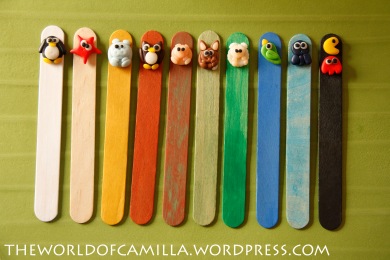
Bookmarks – Animals

What do you think about these bookmarks???

Immagine

Actually I made them a long time ago, but I still find them very pretty (and funny looking too).

I used wood waxing sticks (yep, waxing ones, but I promise, they were new :P) and acrylic paint for the basis.

The animals are made of polymer clay, the type you must put in the oven to make it hard.

Ahah maybe Pac-man in the end doesn’t have much to do with the other ones, but that time I was kind of in love with it so I made it (and I have to say it was the most difficult to make because I didn’t use any tools for the clay).

Do you like them?

I cannot decide which one is my favorite. The starfish? The owl? I dunno.

How about you???

Advent calendar

_MG_1344 copia

For this past Christmas I felt like creating an advent calendar for my daughter which we could use again and again and it could be washed if needed.

So… here is my project!

It’s not difficult to make but it takes a bit of time. (That’s why I actually started sewing it in November and finished it one month later… Hem 🙂 ). But anyway this is the result!!!

Immagine

What I did first is cut the numbers out of red light felt and then I did the same with the vlieseline. Then I cut the squares with the gold reindeer (by the way, isn’t that extremely cute???) and I ironed the three pieces together to fix the numbers on the fabric. Be sure you iron on the fabric side, not on the felt, because otherwise it will stick on the iron.

Then I sewed them together like this:

_MG_1344 copia

After that I cut a white fabric into squares to make the pockets lining and I sewed the squares together on the wrong sides.

I turned the squares inside out and just sewed them with a zigzag on the red fabric basis.

Immagine

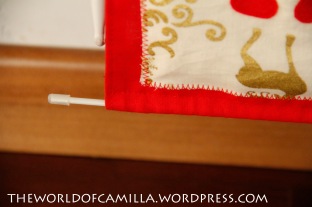
When I sewed the basis sides I made two spaces on the top and on the bottom to put two sticks in order to make everything more structured.

Immagine Immagine

That’s it!!!

Am I missing anything…? Oh yes! The funniest part!!!

To fill the pockets with cute tiny surprises!

Immagine

Happy sewing!!!

Camilla

What children teach us: TO TURN NEGATIVE INTO POSITIVE

Immagine

(This post is not to be read by a child).

Today I went with my daughter to the pediatrician. While waiting, an old woman came in with her daughter and her sick grandchild. After a while, she started asking me some questions about me and my personal life (I really do not like when this happens).

“Is your husband a good man?”.

“A very good man indeed.”.

Then she started telling me about the worst and cruel things she heard of.

A man who killed his wife and son. Some crazy guy who put acid on his girlfriend’s face. Then she said she would take these people and she would cut them into pieces and eat them. (Sorry if I tell you the whole story, but I want you to understand how big my panic was).

So in this terrible situation, I held my daughter as close to me as I could, trying to understand if she could get what the grandma was saying (I really hoped not).

The answer came soon.

My daughter started singing in a very low voice. I guess when children do that it’s exactly because they don’t want to listen to what one is saying.

I felt so in panic, I didn’t know what to do. So I tried to quit the woman’s last sentences with a couple of “Eh” and then I took a book and showed it to my daughter.

Once at home, I was helping my little lady to take off her shoes and I looked into her eyes.

“You know, some people can speak only about bad things.”

“And why?”

“Maybe because they are afraid.”

“Why are they afraid?”

“Because they are weak. It takes much more strength to be happy, and it’s a lot easier to be sad. And we are strong.”

She smiled.
What children teach us: SIMPLICITY

Immagine

Two days ago it was a sunny cool day, so I started thinking where I could take my daughter outside to breathe some fresh air. I don’t know why, but usually the first places that come into my mind are kind of far to reach, as if I’m always looking for something “special” to do. So this would mean to take a car, to spend at least one hour away and it would take a little stress. But this time I just asked her.

“Where would you like to go?”.

“Why don’t we take a walk here down the street so that I can find three big leaves to take back home?”.

So we went.

We reached a small lawn with a bench and we sat down. “Look at the sky! How high the birds fly!”. How wonderful.

Then it was fun watching two cats playing with each other and also a few chickens that came to us maybe because they thought we were going to feed them, but hey, unfortunately we had come just to say hi.

“Look mum! These leaves are perfect! I’ll take one for me, one for dad and one for you!”.

What can look obvious and simple for us, is instead something extraordinary for a child. The world is full of wonderful things but we are usually too use to them or too in a hurry to notice them; children teach us to rediscover simplicity.

Carrot cake with cheese frosting

carrotcakewithcheesefrosting

INGREDIENTS

Cake:

  • 160 g sugar
  • 125 ml yogurt
  • 125 ml milk
  • 1 tsp baking soda
  • 250 g flour
  • 40 g potato flour
  • 4/5 carrots
  • 1 lemon peel

Cheese frosting:

  • 115 g cream cheese
  • 60 g butter
  • 250 powdered sugar
  • 1/2 table spoon milk

LET’S BAKE!

Cake: 

Ok this is super easy to make! Mix the two flours together with the baking soda and sugar. Skin and chop up the carrots. Add milk, yogurt, carrots and the lemon peel. Stir together and put it in your baking tin. The mixture will look kind of hard but don’t worry because the carrots have a lot of water inside. Bake at 180° for 20-25 minutes.

Cheese frosting:

Cream butter with the cream cheese, add and beat the powdered sugar and then put milk (very carefully!). It should come a soft cream. If it is too fluid, add some more powdered sugar. Wait until the cake has cooled to spread on the frosting (I baked the cake the day before) and leave it in the fridge at least a couple of hours before serving.

Enjoy!